Text를 화면에 표현하기
페이지정보
내용
Text를 화면에 표현하기
이번 강좌에서는 Text를 SCREEN안에 표현해보는 것을 알아본다.
pygame안에서 객체를 SCREEN안에 보여주기 위해서는 Surface 객체로 변환해야 한다.
이미지 역시 pygame.image.load() 하는 순간 Surface 객체로 변환되어서 저장된다.
따라서 Text도 Surface 객체로 변환 후, SCREEN 안에 blit 하여 복사해준다.
Text를 Surface 객체로 변환하기 위해서는 다음 순서로 진행한다.
1) 시스템의 폰트로부터 Font 객체를 생성한다.
2) 생성된 Font 객체를 통해 Text를 새로운 Surface 객체로 그려준다.
3) 생성된 Surface 객체를 SCREEN에 blit 해준다.
1. Font 객체 생성
시스템의 폰트로 부터 Font 객체를 생성하는 메서드는 SysFont() 이다.
형식은 아래와 같다.
pygame.font.SysFont( font name, size, bold=False, italic=False)
Sysfont() 메서드를 통해 Font 객체를 생성하여 저장한다.
| myFont = pygame.font.SysFont( "arial", 30, True, False) |
시스템 폰트를 사용하지 않고, font file로 부터 폰트 객체를 생성하려면 Font() 메서드를 사용한다.
pygame.font.Font(font filename, size)
| myFont = pygame.font.Font( "Font.ttf", 30) |
default 시스템 폰트를 사용하려면 font filename을 "None"으로 한다.
| myFont = pygame.font.Font( None, 30) |
만약, 시스템 폰트의 이름을 모른다면 get_fonts()를 통해 시스템의 모든 폰트 이름을 확인할 수 있다.
| print( pygame.font.get_fonts() ) |
결과
|
['arial', 'arialblack', 'bahnschrift', 'calibri', 'cambriacambriamath', 'cambria', 'candara', 'comicsansms', 'consolas', 'constantia', 'corbel', 'couriernew', 'ebrima', 'franklingothicmedium', 'gabriola', 'gadugi', 'georgia', 'impact', 'inkfree', 'javanesetext', .......... .......... 'hcrdotumext', 'hcrbatang', 'hcrbatangext', 'hcrbatangextb', 'hyhwpeq', 'hancomeqn', 'newjumja', 'hancomgothic', 'hancomgothicregular', 'haanwing2', 'hansantteutdotumregular', 'hansantteutdotum', '한컴산뜻돋움', '한컴산뜻돋움regular'] |
2. Surface 객체에 Text 쓰기
Font 객체는 render() 메서드를 통해, Text를 Surface 객체에 그려준다.
형식은 아래와 같다.
render(Text, antialias, color, background=None)
render() 메서드를 통해 Text를 Surface 객체로 생성한다.
|
BLACK = ( 0, 0, 0 ) text_Title= myFont.render("Pygame Text Test", True, BLACK) |
# 안티알리아싱은 선을 그릴때, 픽셀사이에 blur bit를 사용하여 선을 부드럽게 만드는 그래픽 기법이다.
만약 안티알리아싱을 하지 않으면 글자의 선이 매우 투박하게 나타난다.
3. 생성된 Text Surface를 SCREEN에 blit() 하기
Text Surface를 SCREEN에 blit()하는 것은 Image를 표시할 때, 사용한 것과 같다.
형식은 아래와 같다.
SCREEN.blit(text_Title, 좌표)
| SCREEN.blit(text_Title, [200, 300]) |
모든 Surface는 Rect 객체를 가질 수 있다.
만약 Text_Title을 SCREEN의 가운데에 위치하고 싶다면, Image와 마찬가지로 Rect 객체를 이용할 수 있다.
|
text_Rect = text_Title.get_rect()
text_Rect.centerx = round(SCREEN_WIDTH / 2) text_Rect.y = 50
SCREEN.blit(text_Title, text_Rect) |
4. Text 표현하기 전체 코드
|
import pygame
# 스크린 전체 크기 지정 SCREEN_WIDTH = 400
# 색상 상수 BLACK = (0, 0, 0)
# pygame 초기화 pygame.init()
# 스크린 객체 저장
# FPS를 위한 Clock 생성
playing = True # 이벤트 처리 if event.type == pygame.QUIT:
# 스크린 배경색 칠하기 SCREEN.fill((255, 255, 255))
# Font 객체 생성 myFont = pygame.font.SysFont( "arial", 30, True, False)
# Text를 surface에 그리기, 안티알리어싱, 검은색 text_Title= myFont.render("Pygame Text Test", True, BLACK)
# Rect 생성 text_Rect = text_Title.get_rect()
# 가로 가운데, 세로 50 위치 text_Rect.centerx = round(SCREEN_WIDTH / 2) text_Rect.y = 50
# Text Surface SCREEN에 복사하기, Rect 사용 SCREEN.blit(text_Title, text_Rect)
# Text를 surface에 그리기, 알리어싱, 검은색 text_Title2= myFont.render("Pygame Text Test 2", True, BLACK)
# Text Surface SCREEN에 복사하기, 좌표 사용 SCREEN.blit(text_Title2, [50, 200])
# 작업한 스크린의 내용을 갱신하기 pygame.display.flip()
# 1초에 60번의 빈도로 순환하기 clock.tick(60) |
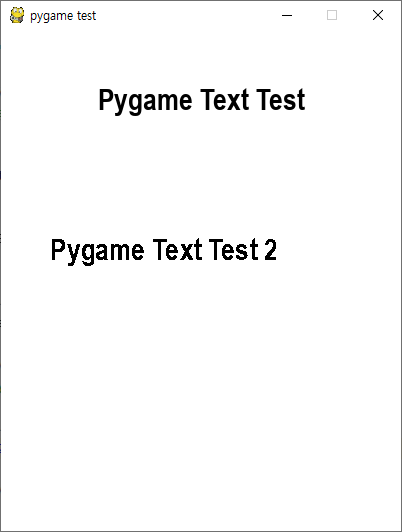
실행 결과
안티알리아싱이 적용된 Text와 알리아싱이 적용된 Text의 차이점과
Text도 render()를 통해 Surface 객체에 그려져 이미지처럼 Rect를 사용할 수 있다는 것을 알아둔다.


